Monday, June 27, 2011

A "Little" Update


It wasn't my intention, but looks like I've done nothing but Etsy tutorials for the past 3 month! My apologies for those of you who aren't interested in opening a new shop. I'm not exactly the fastest writer in the world, and writing in Japanese doesn't come easy for me anymore, so I usually work on one post for about 2, 3 days. Then, I have no energy to write until it's time to start a new one.

I do want to give you some updates, though, since tomorrow is the last day of school for my son, and I don't know how much writing I'll be able to squeeze in for the next 2 months!

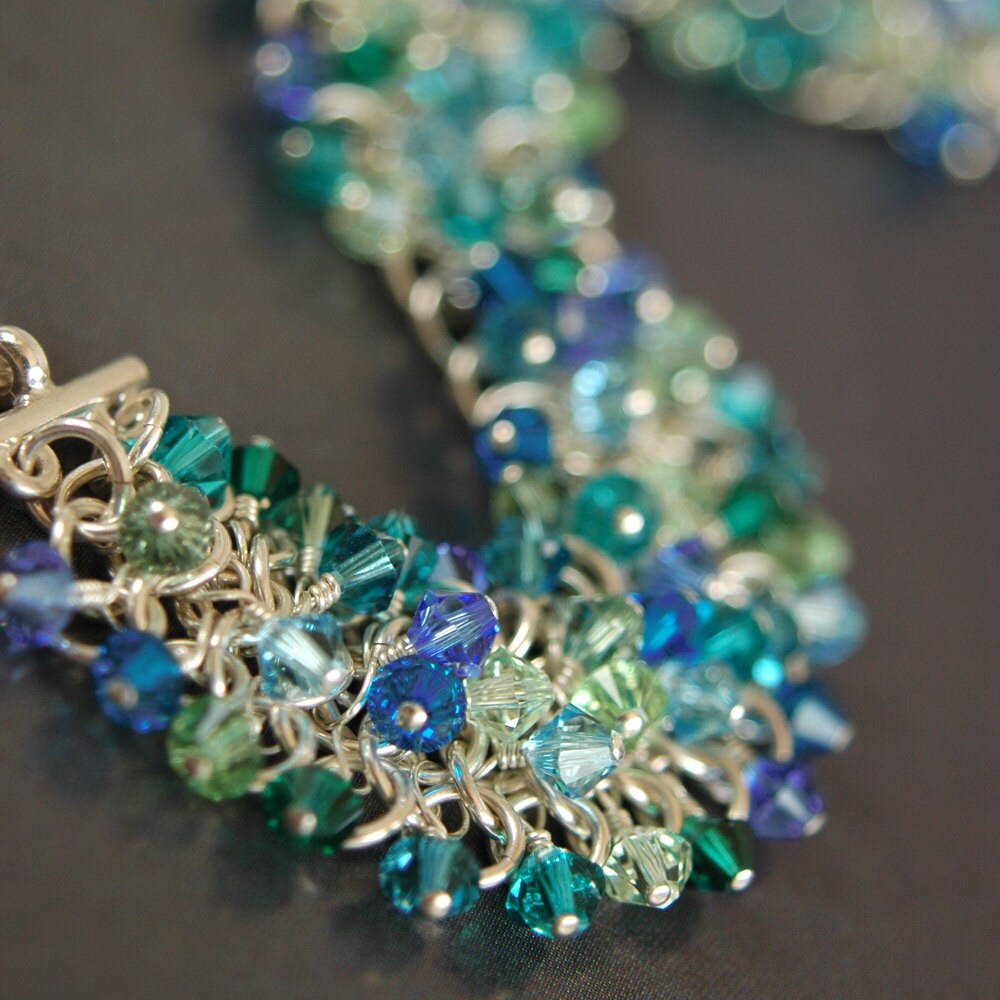
I posted one new bracelet shown above and have been working on another custom order. I know, that's not a lot to show for 3 months, and it's being reflected in my sales. Ouch!! But I have a good reason...

...I've had absolutely no creative energy because I've been using all my energy on creating a little human. :) I'm about 18 weeks along, and just beginning to feel some movement. He/She is quite rambunctious, actually. My midwife listened to the baby's heartbeat, and immediately said, "Sounds like a boy!" According to her, boys' heartbeats are usually slower than girls'. We shall see in about 2 weeks.

So, anyway, if you don't see me around too much, don't worry. I'm probably just out enjoying my last few months of "alone time" with my son before he'll have to share Mommy with a new sibling.

Friday, June 24, 2011

出品の仕方- How to List an Item Vol. 2


先週のポストでEtsyへ作品を出品する時の話を始めましたが、あともう少し詳細を記入する必要があります。
In last week’s post, I started talking about listing an item on Etsy. There are a few more things you need to fill out, so let’s keep going.

前回はShop Sectionまで記入しました。次はTagsです。Tagsにはその品を検索する時使われそうなキーワードを記入します。すでに選択したCategoriesもTagsと同じように扱われるのでそれ以外のキーワードを選びます。何色か、誰が使うものか、どんな形式か、絵がついていれば何の絵か等色々考えてみてください。品によっては同じ物でもスペリングや呼び方が国によって違う場合もあります。例えば私が作っている「Chainmaille」。人によっては「Chain Maille」「Chainmail」「Chain Mail」とも書いたりもするので4種全部キーワードとして記入しました。Tagsに関してはこちらにもっと詳しい記事があるので読んでみてください。
The last thing we filled out was Shop Sections. Next, you’ll need to enter the Tags. Choose keywords that would most commonly be used to search for your item, but since the Categories that you’ve already selected are treated the same way as Tags, you won’t need to repeat the same words. Try to think of words that refer to the item’s color, who would use it, the item’s type, and if there are any, the kind of pictures that are on the item. Keep in mind that the spelling or the name of an item may differ depending on the countries. For example, I list things in the “Chainmaille” category, but some people may search for “Chain Maille” “Chainmail”, or even “Chain Mail.” I use all 4 as my keywords. To learn more about Tags, please check out this article.

Tagsの次にはMaterialsに使った材料を記入します。Tagsでもそうですが「Sterling Silver」のように普段から一緒に使われている言葉なら複数の単語を一つのTag、またはMaterialとして記入することを許されています。記入欄の数が足りないからと言って「Fine Silver and Gold」のように似たような材料をまとめて書いてはいけません。この場合は「Fine Silver」と「Fine Gold」として別々に書き込みます。
After Tags, you’ll be filling out the Materials. This is also the case with Tags, but if 2 or more words are commonly used as a phrase, such as “Sterling Silver,” you can use them as one tag. However, you can’t squish together similar materials in one tag, such as “Fine Silver and Gold” just because you are running out of space. In this case, they have to be listed as 2 separate materials, “Fine Silver” and “Fine Gold.”

さあ次はPrice、値段です。大体の値段を計算するために材料の費用、製作時間、写真撮影・加工に費やした時間等を前もってメモしておきます。もし製作の際にスタジオを借りたり電力を多く消費する場合はそれにかかる費用も計算しておきます。それから時給を払ってもらえるとしたらどれくらいになるか計算して、費用と足します。いくらになりましたか? 品によってはやはりすこし値下げする必要も出てくると思いますが、余りに安すぎると反対に品質が悪いのではないかと疑われることもあります。
Next is the Price. To help you calculate a rough estimate, write down the cost of the materials as well as the time spent making the item, photographing the item, and editing the photos. If you rent a studio space or the creation process requires a lot of electricity, you’ll want to add up the cost for that too. Then, calculate how much you would get paid if you were paid hourly, and add that number with your cost. What price did you come up with? Depending on the item, you may have to lower the price, but if it’s too cheap, some buyers may become suspicious of the quality of your item.

Quantityは在庫数のことです。一品物ならもちろん「1」ですが複数ある場合も記入した数の分だけListing Feeを取られるので、よく売れる品と分かるまでは「1」にしておいたほうが良いかと思われます。
In the Quantity, you enter how many you have on hand. Until you know which ones are most popular, however, you may want to list the items individually since you’ll be charged a listing fee for each item that you say is in stock.

最後にShippingの欄を記入します。送料がどれくらいになるのか分からなければ、日本住まいのSellerさんを検索してどう設定していらっしゃるのか探してみましょう。ただし品の重さによってだいぶ違いがでるのでそこは気を付けてください。小さくて軽い品であれば、大体の送料が分かるまでFree Shipping Sale、と言うのも一つの手ですが海外からはちょっときついかも。あと、このShippingの料金の中には送料だけでなく梱包品の費用を含めるのもお忘れなく。
Last but not least, you enter your Shipping charges. If you don't know how much the shipping may cost, try looking for other sellers in your area and see what they are charging. Do pay attention to the weight of their items, though, since it will influence the shipping price heavily. If you are selling something small and light, you could also try doing a "Free Shipping Sale" until you figure out the general charge. This may be a little hard to do if you’re an international seller, though. Also, don’t forget to include the cost of the packaging materials in your Shipping charge as well.


全欄記入できたら一番下の青いPreview Listingというボタンをクリックします。上の写真のように詳細ページのプレビューが出てくるのできちんと記入できているか確認してください。内容が全て正確であれば後は上の青いPublishのボタンをクリックするだけです。後ほど出品したいのならSave as Draft(下書きとして保存)、何か訂正したいのならEditのボタンをクリックしてください。一度下書きとして保存した品を出品する時はYour AccountからDraft Listingsのページに行き、出品したい品を選択します。
Once everything is filled out, go to the bottom and click the blue Preview Listing button. As above, you’ll see a preview page of your listing, so check that everything is correct. Once you’re done, all you have to do is click the blue Publish button at the top. If you want to list the item later, click Save as Draft, and click Edit if you want to change something. When you’re ready to list the item that you saved as draft, go to Your Account > Draft Listings, then click on the item you want to list.


Publish のボタンをクリックするとその時初めて手数料を取られます。ちゃんと出品できていれば「Success! This listing is now available to shoppers.」と書いた緑色の箱が現れるはずです。
When you click the Publish button, you will then be charged the listing fee. If everything goes smoothly, you should see a green box at the top that reads, “Success! This listing is now available to shoppers.”
Friday, June 17, 2011

出品の仕方 How to List an Item - Vol. 1


さて、本題の「Etsyへの出品」の話になかなかたどり着かないなと思っていらっしゃった方、お待たせしました! 実はわりと最近出品の仕方が変更されたので、それを待っていたのとブログで紹介する前に自分でも試したかったのとで、なんだか随分ゆっくりなペースになっておりました。ご了承願います。
For those of you wondering how long you would have to wait before I’ll actually talk about listing an item on Etsy, your wait is finally over! The pace has been slow because soon after I started writing these tutorial posts, Etsy announced that they would be changing the listing process. So I was waiting for that to happen as well as to try out the new process myself. I hope you understand!


では実際に作品を出品してみましょう。Etsyで出品するにはまずYour Accountのページに行き左側のItemsという項目からAdd New Itemをクリックします。一番初めのAbout this Itemでは「Who made it?」(誰が作った物か?)「What is it? 」(これは何か?)「When was it made? 」(いつ作られたか?)と聞かれるので選択肢の中から自分の品に一番合った答えを選んでください。
Ok, so let’s list your work on Etsy! First, you’ll need to go to Your Account page and click on Add New Item on the left hand column under the Items heading. In the About this Item section, you’ll be asked the following: “Who made it?”, “What is it?”, and “When was it made?” Choose the answers that fit your item the best.

次はCategoriesを選択します。より簡単に見つけてもらえるよう、できるだけ細かく仕分けましょう。この時実際使われている英語とカタカナ英語の違いに気をつけてください。例えば日本語でアクセサリーと言うとたいていの方はネックレスなどのジュエリーを連想されると思いますが、スカーフや帽子等もAccessoriesの中に入ります。もちろんジュエリーもAccessoriesと言ってよいのですがEtsyではJewelryのカテゴリーが別にありますのでネックレス等はそちらに出品してください。後はKnitting(編み物)とCrochet(鉤針編み)のように似たようなものでも細かく分けてあることがあるのでそちらも気をつけてください。
Next, you’ll be selecting the Categories for your item. To make it easier for your customers to find your item, try to be as specific as possible. Beware that some popular items such as Jewelry may have its own category distinct from another broader category like Accessories. Also, items that are quite similar in appearance, such as Knitting and Crochet, may still be in separate categories too.

その次は写真をアップロードします。写真の話は先々週先週、二回にわたってしましたのでそちらをご覧になってください。
The next section is for uploading the photos of your item. Please read my last 2 posts if you want more specifics about photographing your products.

それから一番肝心な品の名前と詳細を記入します。Item TitleとItem Descriptionの始めの数文には検索エンジンで見つかりやすくするため、なるべくたくさんのキーワードを使いましょう。後はサイズやどうやって作ったかなど自分で買う時どんなことを知りたいか、と考えながら書き込みます。サイズはセンチとインチ、両方で表示することをお勧めします。国によっては何センチ、と言われてもピンと来ない方が多くいらっしゃいます。ちなみに1インチは約2.5cmです。
Next up is the all-important Item Title and Item Description. Try to include as many keywords in the title and the first few sentences of the description so that your item will be easy to find on search engines. For the rest, try to think about what information you would like to know if you were the buyer, such as size and how the item was made. I recommend that you indicate the size in both inches and centimeters since many people are not familiar with one or the other. 1 inch is approximately 2.5cm.


またまた長いポストになりそうなので今回はShop Sectionで終わりにしましょう。Shop Sectionは必ず作成する必要はありませんが品数が増えてくるとゴチャゴチャしてくるので例えばNecklaces、Bracelets、Earringsのように仕分けしたほうがお客様にも便利です。その場で新しいSectionを作成できますが、変更したり順番を変えたりしたい時はYour AccountからInfo & Appearanceページに行きSectionsのタブをクリックします。
Looks like this will be a long post again, so I’ll finish this week with the Shop Section. You are not required to create any Shop Sections for your store, but because it starts getting confusing once the number of your listings increase, it’s probably best if you do split them, such as Necklaces, Bracelets, and Earrings. You can choose to create a new section as you are doing the listing, but if you want to change the names or rearrange the sections, you can access them by going to Your Account > Info & Appearance page, and then clicking on the Sections tab.

残りのTags、 Materials、 Price、 QuantityとShippingについては来週話を続けます。
I’ll have to save the rest of the process for the next week’s post. We’ll talk about Tags, Materials, Price, Quantity, and Shipping then.

Friday, June 10, 2011

キレイな写真を撮るコツ Tips on Photographing Your Products


先週「品物の写真はお店の命」と言う話をしました。Etsyのお店のためにプロ級のカメラや用具をわざわざ購入する必要はありませんが、でもなるべくキレイな写真を撮れるよう少しは勉強したほうがいいとは思います。いくら素敵な品や面白い品を販売していても、写真が暗かったりブレがひどかったりすると多くのお客さんは詳細を見てもくれません。ということで今週は写真を撮る時のコツを少しご紹介したいと思います。
Last week, I mentioned the importance of having good pictures of your product. I don’t think it’s necessary for you to buy a professional grade camera just for your Etsy store, but I do think you should do a little homework about taking good photographs. Even if you have a great product, many people won’t bother to look at the listing if the pictures are dark or blurry. So, this week, I’ll share some tips on taking good photos of your products.

1.カメラの使用説明書をしっかり読む ~ Read your camera’s manual
まずは今もっているカメラにはどんな機能があるのかしっかり勉強しましょう。白くあるべきものが青く写ったり黄色く写ったりしてしまった時、ホワイトバランスの調整はできますか? 露出補正はどうでしょう? もっと明るい写真にしたい時などこれがあると便利です。小さな品を撮る時便利なクローズアップモードはありますか? 「こんなことできるなんて知らなかった」という発見もあるかもしれないのでせめてパラパラッとでも目を通してみてください。
First thing first, let’s find out which functions are available on your camera. If something that is supposed to be white appears blue or yellowish in your photo, can you adjust the white balance? How about adjusting the brightness? If there is a feature that allows you to do that, it’ll come in handy when you want your photo to be a little brighter or darker. Does your camera have a Close-Up mode if you plan on selling relatively small items? You should at least flip through the manual. You might discover something there that makes you say, “I didn’t know it could do that!”

2.カメラのフラッシュは使わない ~ Don’t use the built in flash
カメラをオートにセットして室内で写真を撮ると、たいていの場合は自動的にフラッシュがたかれます。くっきりとした写真が撮れることは撮れるのですが、品物が変に光ってしまったり 真正面からの光で立体感がなくなってしまうことがよくあります。大きな窓のそばなど なるべく明るい場所で撮影すればフラッシュをたく必要はなくなります。それでも暗すぎて写真がブレてしまう場合は三脚を使うことをお勧めします。
When you take a picture indoors with the camera set on Auto, the built in flash automatically turns on most of the time. The resulting picture is usually nice and crisp, but there are often glares on the product, or the item ends up looking flat due to the harsh light from the front. Try to take your photos in a brightly lit area, such as right next to the window, so that you won’t have to use the flash. If the picture turns out a little blurry because the area is still a little too dark, a tripod will help tremendously.

3.大きな白い紙か布を用意する ~ Get a large piece of white paper or cloth
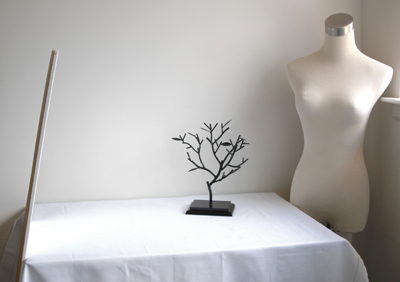
私は品物の写真は上のように窓際の机で撮影しているのですが、左側に大きな鏡が立てかけてあるの、お分かりですか? 肉眼ではそう違いはないのですが、写真で見ると鏡のあるところだけ随分明るくなっているのが一目で分かります。大きな鏡がなくても窓の反対側に大きな白い紙や布を設置するだけで同じ効果があります。これ一つあるだけで写真の印象が随分やわらかくなりますのでぜひ試してみてください。
I usually take my photos at a desk near a window, as shown in the photo above, but can you tell that I have a mirror propped up against the desk on the left hand side? It’s not very noticeable when you are looking at the set-up with your own eyes, but the area in front of the mirror is clearly brighter than the rest when a camera looks at it. If you don’t have a large mirror, setting up a large piece of white paper or cloth opposite your window will do the same trick. This simple trick will significantly soften the impression of your photographs, so try it!


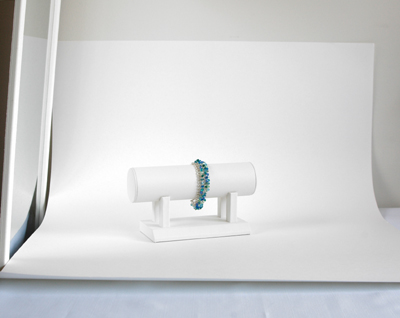
大きな紙や布は背景としてもすごく役立ちます。撮影している時には全然気付かなかったのにできた写真を見たら背景に変な物が写っていた、なんてよくある話です。白い机と白い壁の境目でさえ気になってしまうこともあるので大きな紙をうまく使って背景のごちゃごちゃを始めから隠してしまいましょう。写真のように紙の半分を品物の下に敷き、上のほうは壁に立てかけるようにするとキレイに撮れます。
A large paper or cloth will also come in handy as your backdrop. You’ve probably taken at least one picture that you thought was great, but had a distracting background when you looked at the actual photograph. Even the borderline between a white desk and a white wall can be distracting, so it’s much easier if you just cover up the background in the first place. You can get a simple and smooth background by placing half of the paper underneath your item and leaning the rest against the wall, as in the photo.

あとは品物にもっと近づく、真上・真正面からだけでなくいろいろな角度から撮ってみる、などすると目を引く写真が撮れるようになるはずです。
Other than that, if you get close to your item and shoot pictures from multiple angles (not just the front and the top); you’ll probably end up with nice, eye-catching photos.

Friday, June 3, 2011

品物の写真撮影 Photographing Your Products


ネットでお買い物した時のことを考えてください。本とかDVD等外見はどうでもいい品を買うなら別ですが、やはりたいていの場合は買う前に品物の写真をちゃんと見たと思います。ただ単にピンク色だと言われたってそれが淡いピンクなのか派手なピンクなのかは写真を見ないと分かりません。とくにEtsyでは手作りのものや一品物を販売することが多いので写真は絶対に必要です。実際「品物の写真はお店の命」と言ってもいいほどです。
Think back to the last time you purchased something online. Unless the outside appearance of the item was irrelevant to you, like if you were looking for books or DVDs, you most likely wanted to see pictures of the item before you purchased it. If the description only told you that the color was pink, you wouldn’t know if the item was soft pink or bright pink until you looked at the picture. Since you most likely will be selling handmade and one-of-a-kind items on Etsy, having good pictures is essential. In fact, it may not be too far fetched to say that your item pictures can make or break your store.

Etsyでは出品する際、一品5枚まで写真をアップロードできるようになっています。品物を手で触ることができないお客様のためにもなるべくたくさんの写真をいろいろな角度から撮りましょう。例えばハンドバッグを販売する場合にはこんな5枚を:
  1. 真正面から撮った写真
  2. バッグを開いて中のポケットなどが見えるように撮った写真
  3. 大きさが分かるようにモデルに持ってもらったり日常品をそばに置いて撮った写真
  4. 素材の質感が分かるようにぐんと近づいて撮った写真
  5. バッグの裏側や底の構造が分かるような写真

When you list an item on Etsy, you can upload up to 5 pictures per listing. Since your customers won’t be able to touch the item with their hands, make the photos as descriptive as possible. For example, here are the 5 pictures you might take if you are selling handbags:
  1. A straight on shot of the bag.
  2. A shot of the bag from the top to show the inside pockets, etc.
  3. A shot in which a model is holding the bag or it is next to an everyday object, in order to emphasize the item’s size.
  4. A close-up shot of the item to show off the texture of the material.
  5. A shot that shows the back or the bottom construction of the bag.


一枚目の写真はサムネイルとして色々なところで使われますので5枚の中からもっとも目を引くものを選びます。さて、ここが少し厄介なのですがEtsyでは作品のリストを見るときにGallery Viewで見るかList Viewで見るかをユーザーの好みで選択できるようになっていて、サムネイルもGallery Viewの場合は170x135ピクセルの長方形、List Viewの場合は75x75ピクセルの正方形とどちらを選んだかによって変わってしまいます。要するに長方形でも正方形でもきれいに見える写真を撮らなければいけないと言うことです。
The first picture of the listing will be used as a thumbnail in many areas of Etsy, so pick the most eye-catching one from the 5 photos. Now, this is where things get a little tricky, but on Etsy, a user can choose how to view a list of items, by “Gallery View” or “List View.” When you choose Gallery View, the thumbnail is a 170x135 pixel rectangle. But in List View, the thumbnail changes to a 75x75 square. In other words, you have to frame a picture so that it looks great both as a rectangle or a square.

たいていの方はこのため、始めから写真を正方形にトリミングしていらっしゃいます。そうすれば正方形のサムネイルにぴったりですし長方形の場合も上下がほんの少し切り取られるだけになります。横長の長方形の写真も使えますが170x135と同じ比率にトリミングしておかないと長方形のサムネイルでも両端を切り取られてしまいます。縦長の長方形は切り取られる面積が多くなってしまうのでお勧めできません。帽子を売っているのに肝心な帽子は切り取られていてモデルさんの顔しか見えない、なんていうサムネイルも時々見かけます。
For this reason, many people crop their photos as a perfect square from the beginning. This way, the square thumbnail looks exactly the way you intended it to look, and only a little bit of the top and the bottom will be cut off for the rectangular thumbnail. You can also use a rectangular picture if it’s horizontal, but unless you crop it to the same ratio as 170x135, some parts of your picture may be cut off even in the rectangular thumbnail. Vertical pictures are not recommended since large areas of your picture will be cut off in both types of thumbnails. I’ve seen listings for hats with only the model’s face in the thumbnail because the actual product was too close to the top of the picture and was cut off.

ちょうどいい形にトリミングできたら画像サイズを縮小して保存します。最低限でも横幅は570ピクセルなくてはいけませんが、たいていの方は800から1000ピクセルぐらいの大きさにしていらっしゃいます。そうすれば品の詳細ページの写真をクリックした時 写真が拡大され、お客様に作品の細かいところまで見せることができます。
Once you’ve cropped your picture to the right shape, reduce the image size and save it. The minimum width is 570 pixels, but many people resize the photos so that they are about 800 to 1000 pixels wide. This is because when you click on the pictures in the item description page, a new window opens up with a larger picture, allowing your customers to see your products in greater detail.

今週は長くなりすぎるので書きませんが、キレイな写真を撮るコツを来週少しご紹介したいと思っています。
I don't have enough space to write about it this week, but next week, I want to share with you some tricks for taking nice pictures of your product.