
先週「品物の写真はお店の命」と言う話をしました。Etsyのお店のためにプロ級のカメラや用具をわざわざ購入する必要はありませんが、でもなるべくキレイな写真を撮れるよう少しは勉強したほうがいいとは思います。いくら素敵な品や面白い品を販売していても、写真が暗かったりブレがひどかったりすると多くのお客さんは詳細を見てもくれません。ということで今週は写真を撮る時のコツを少しご紹介したいと思います。
Last week, I mentioned the importance of having good pictures of your product. I don’t think it’s necessary for you to buy a professional grade camera just for your Etsy store, but I do think you should do a little homework about taking good photographs. Even if you have a great product, many people won’t bother to look at the listing if the pictures are dark or blurry. So, this week, I’ll share some tips on taking good photos of your products.
1.カメラの使用説明書をしっかり読む ~ Read your camera’s manual
まずは今もっているカメラにはどんな機能があるのかしっかり勉強しましょう。白くあるべきものが青く写ったり黄色く写ったりしてしまった時、ホワイトバランスの調整はできますか? 露出補正はどうでしょう? もっと明るい写真にしたい時などこれがあると便利です。小さな品を撮る時便利なクローズアップモードはありますか? 「こんなことできるなんて知らなかった」という発見もあるかもしれないのでせめてパラパラッとでも目を通してみてください。
First thing first, let’s find out which functions are available on your camera. If something that is supposed to be white appears blue or yellowish in your photo, can you adjust the white balance? How about adjusting the brightness? If there is a feature that allows you to do that, it’ll come in handy when you want your photo to be a little brighter or darker. Does your camera have a Close-Up mode if you plan on selling relatively small items? You should at least flip through the manual. You might discover something there that makes you say, “I didn’t know it could do that!”
2.カメラのフラッシュは使わない ~ Don’t use the built in flash
カメラをオートにセットして室内で写真を撮ると、たいていの場合は自動的にフラッシュがたかれます。くっきりとした写真が撮れることは撮れるのですが、品物が変に光ってしまったり 真正面からの光で立体感がなくなってしまうことがよくあります。大きな窓のそばなど なるべく明るい場所で撮影すればフラッシュをたく必要はなくなります。それでも暗すぎて写真がブレてしまう場合は三脚を使うことをお勧めします。
When you take a picture indoors with the camera set on Auto, the built in flash automatically turns on most of the time. The resulting picture is usually nice and crisp, but there are often glares on the product, or the item ends up looking flat due to the harsh light from the front. Try to take your photos in a brightly lit area, such as right next to the window, so that you won’t have to use the flash. If the picture turns out a little blurry because the area is still a little too dark, a tripod will help tremendously.
3.大きな白い紙か布を用意する ~ Get a large piece of white paper or cloth
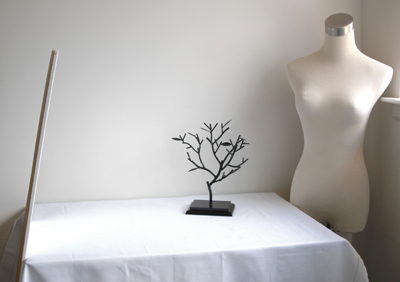
私は品物の写真は上のように窓際の机で撮影しているのですが、左側に大きな鏡が立てかけてあるの、お分かりですか? 肉眼ではそう違いはないのですが、写真で見ると鏡のあるところだけ随分明るくなっているのが一目で分かります。大きな鏡がなくても窓の反対側に大きな白い紙や布を設置するだけで同じ効果があります。これ一つあるだけで写真の印象が随分やわらかくなりますのでぜひ試してみてください。
I usually take my photos at a desk near a window, as shown in the photo above, but can you tell that I have a mirror propped up against the desk on the left hand side? It’s not very noticeable when you are looking at the set-up with your own eyes, but the area in front of the mirror is clearly brighter than the rest when a camera looks at it. If you don’t have a large mirror, setting up a large piece of white paper or cloth opposite your window will do the same trick. This simple trick will significantly soften the impression of your photographs, so try it!
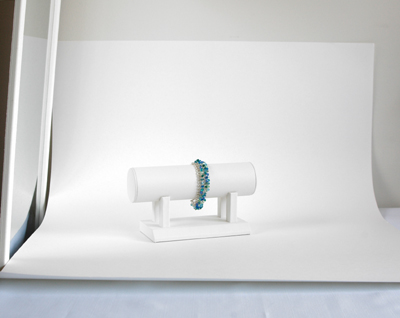
大きな紙や布は背景としてもすごく役立ちます。撮影している時には全然気付かなかったのにできた写真を見たら背景に変な物が写っていた、なんてよくある話です。白い机と白い壁の境目でさえ気になってしまうこともあるので大きな紙をうまく使って背景のごちゃごちゃを始めから隠してしまいましょう。写真のように紙の半分を品物の下に敷き、上のほうは壁に立てかけるようにするとキレイに撮れます。
A large paper or cloth will also come in handy as your backdrop. You’ve probably taken at least one picture that you thought was great, but had a distracting background when you looked at the actual photograph. Even the borderline between a white desk and a white wall can be distracting, so it’s much easier if you just cover up the background in the first place. You can get a simple and smooth background by placing half of the paper underneath your item and leaning the rest against the wall, as in the photo.
あとは品物にもっと近づく、真上・真正面からだけでなくいろいろな角度から撮ってみる、などすると目を引く写真が撮れるようになるはずです。
Other than that, if you get close to your item and shoot pictures from multiple angles (not just the front and the top); you’ll probably end up with nice, eye-catching photos.


No comments:
Post a Comment